![]()
Flywheel Step |
|
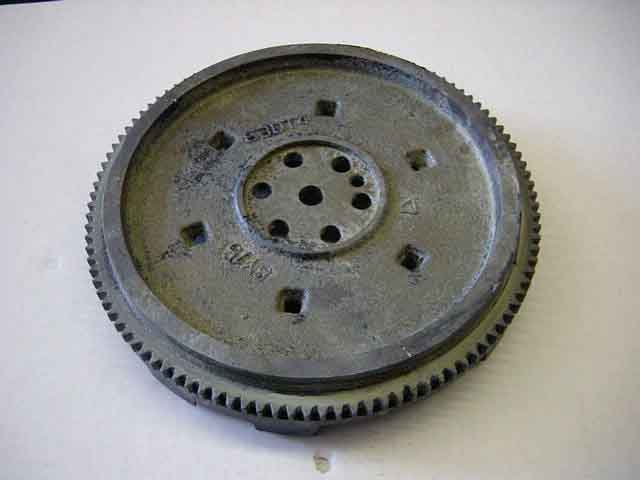
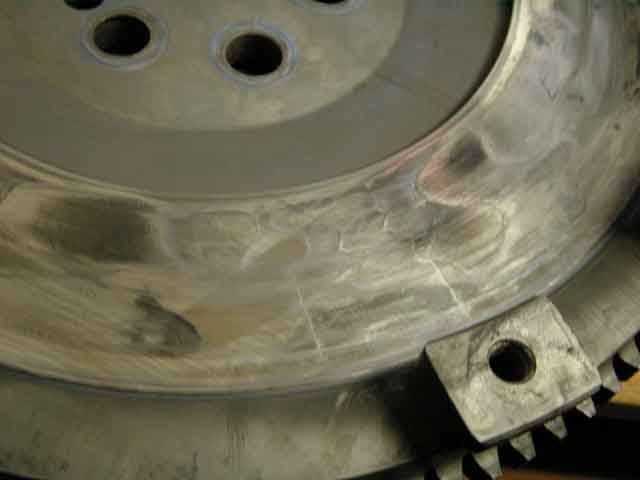
| Flywheel step is the step height of the outer
shelf that the clutch pressure plate bolts to. It is the difference
between the friction surface and the upper step shown here in the pic.
As the clutch's friction surface wears over time and with use, it
becomes uneven and needs to be machined flat when ever a new clutch is
installed. If you were to machine only the friction surface of the
flywheel, the clutch wouldn't grab and hold as well. The step height is
critical to proper clutch operation. Too little (shallow) and the clutch
will hold power great but it will have trouble releasing. You wont have
enough room for the pressure plate to fully retract. When ever a DSM
flywheel is resurfaced, how ever much material is removed from the
friction surface must also be removed from the upper step. Most local
machine shops use a special machine for this. You will ask for the step
and you will be lucky to get with in .005" of what you ask for.
Most all of these machines are set up to resurface the flywheel at a
slight angle (inner diameter slightly deeper than the outer diameter).
Often the tool they are using to measure is not accurate and they dont
even know how to read it.
.608" to .610" is ideal for DSM performance clutches. Up to .613" will work. Do not try to use anything shallower than .608" Stock is .612" Our flywheels come stepped to .609" to .610" always. Yes this works with all the clutches that we sell, we are smart like that, having our flywheels work with our clutches :-) EVO 4-8 cars use a flat flywheel with no step. They are dead flat and any idiot should be able to resurface one correctly. |
|
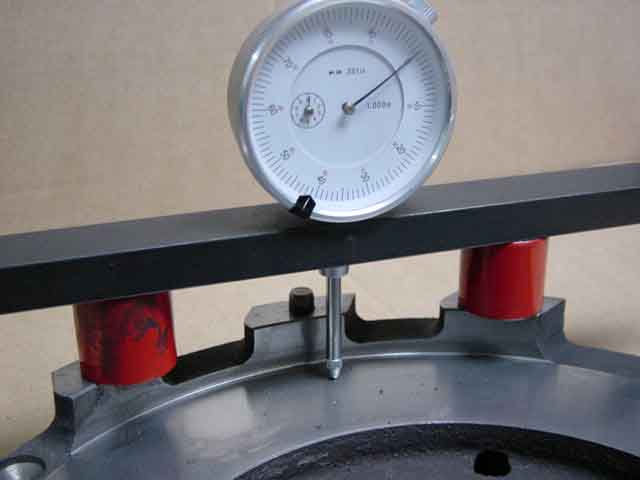 |
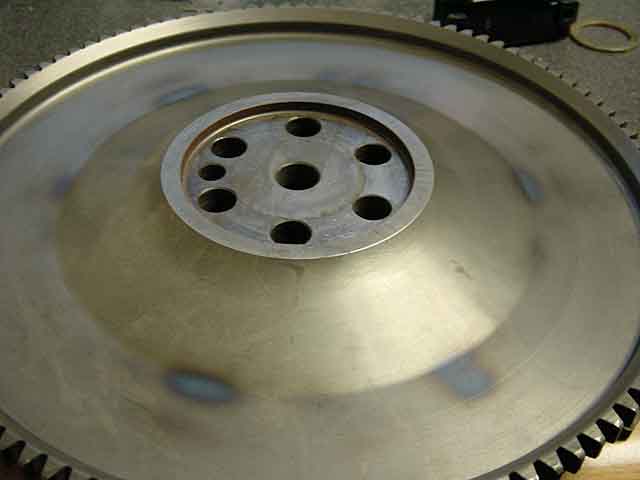
With the dial indicator up on the step, the tool is set at zero. |
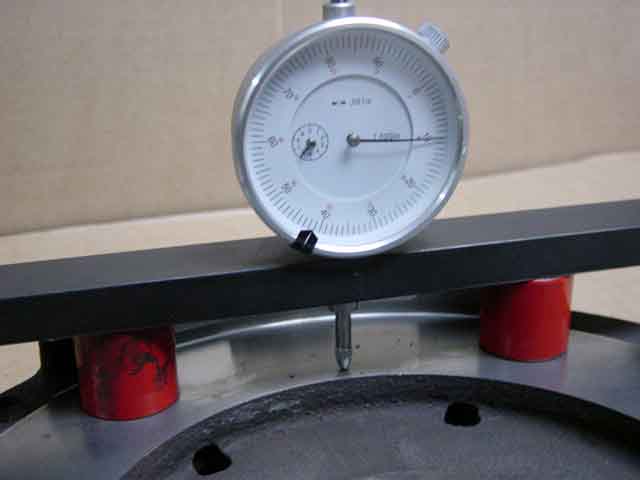 |
The measuring tool is then dropped down to the friction surface. Each rotation on the dial is .100" 6 turns are counted as the tool is dropped down. That is .600" with an additional .010" showing for a total of .610" shown here. |
| If you do have an auto parts store machine
shop resurface your flywheel, here are some steps to help insure that is
gets done right:
1) Ask them to measure the flywheel in front of you when you drop it off. This way you can see for your self how they are doing it and how much they fumble around trying to use the tool. They should be able to easily explain to you what they are doing and how they are doing it. The measurement should be repeatable several times. The tool should not be affected by how straight it is held. Using a regular micrometer as a depth gauge is very sensitive to being tipped even a little off 90 degrees. Depending on weather they zero off the upper or lower surface, they can also read .610" as .590". We have seen this way too much. 2) Ask them if the flywheel will be straight (flat) across it's entire surface. Will it be deeper in the center? Not a good thing. As the clutch pressure plate wears, it also warps inwards at the center. 3) Have them show you the measurement when you pick up the flywheel. DO NOT TRUST THEM. If it isn't right, have them re-do it. |
|
Lightened Flywheels, What We Do:We have very high standards when it comes to our lightened and resurfaced flywheels. This also means that we are kind of strict when it comes to you returning your core. This mostly means don't send anything back in that you wouldn't want to end up with your self. |
|
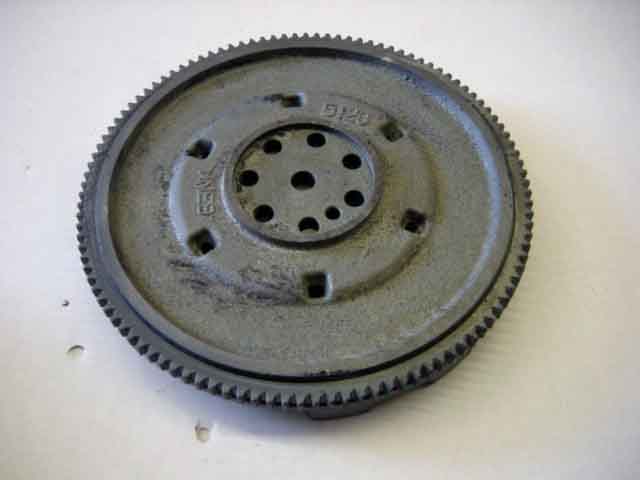
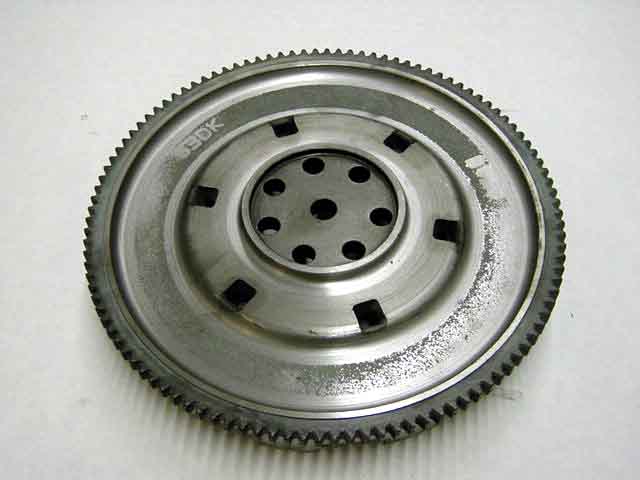
AWD |
|
 |
AWD flywheels have a smaller outer diameter and smaller diameter ring gear. 1G AWD flywheels had n additional weight ring cast into the back side to increase the weight. Later 2G AWD flywheels have a smoother flatter back side. Once lightened, they are essentially the same. |
 |
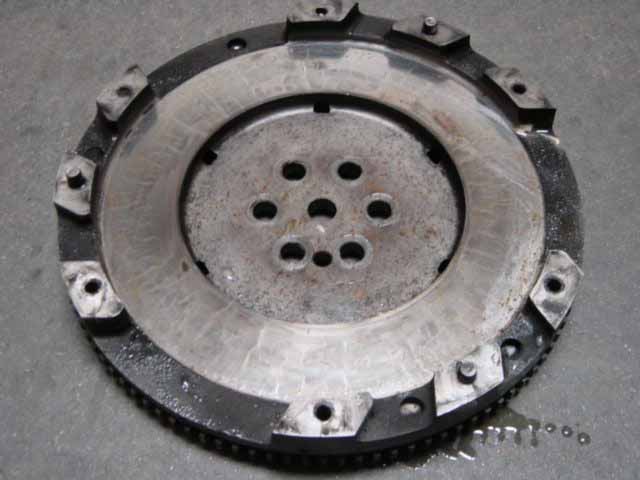
When lightening these, in the thinner center area we only lightly skim off the rough casting. The outer diameter, the area behind the friction surface, is cut to a thickness of .500" The flywheel is resurfaced first, the friction surface is inspected, then the back side is cut to match. If the resurface requires too much material to be removed, then it is rejected for lightening. |
 |
Our machinist is a certified aerospace machinist. When he is not lightening our flywheels, he is turning critical satellite parts. All steps and corners are fully radiused to eliminate any stress risers. They are done on a 6 foot MoriSeki lathe using a special ceramic bit and specific holding and centering tooling. |
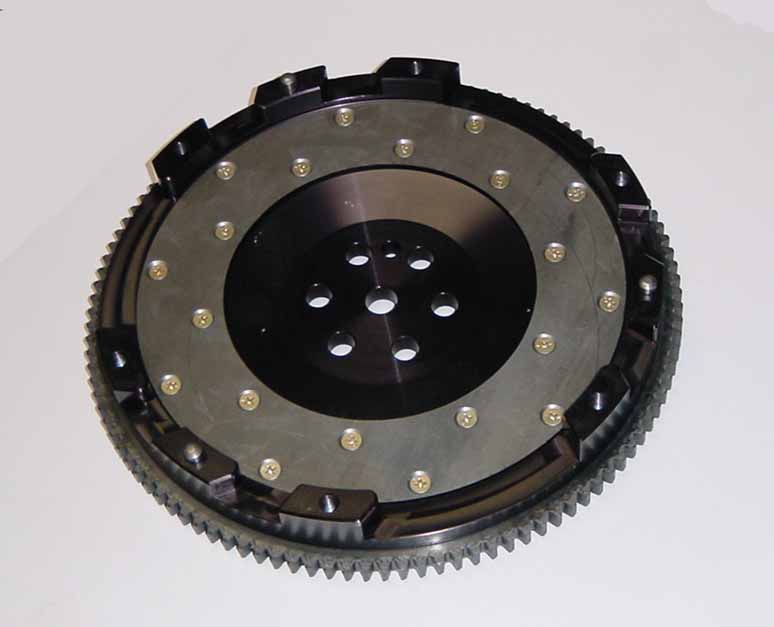
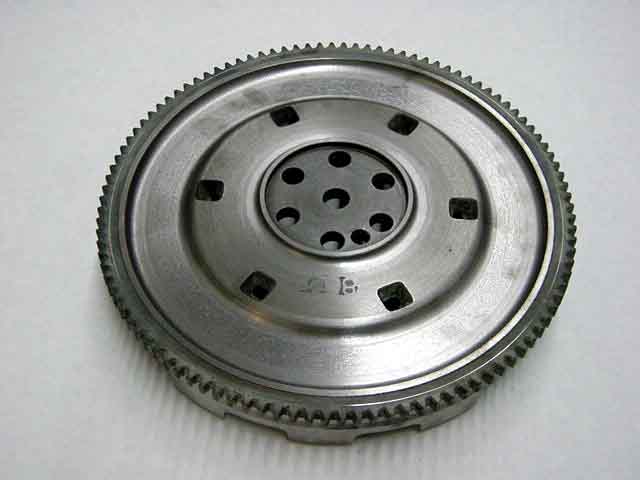
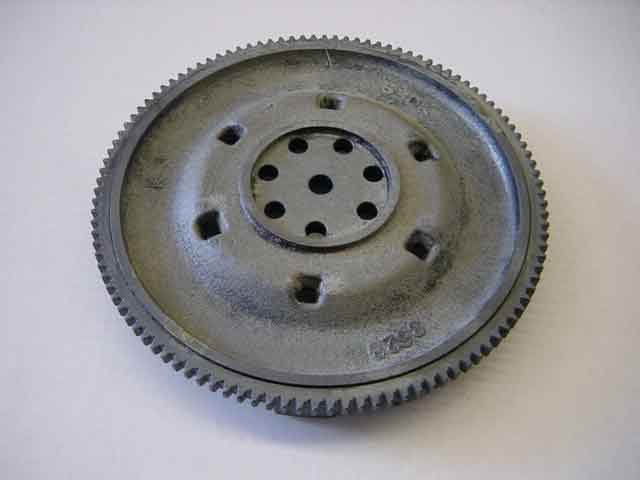
FWD |
|
 |
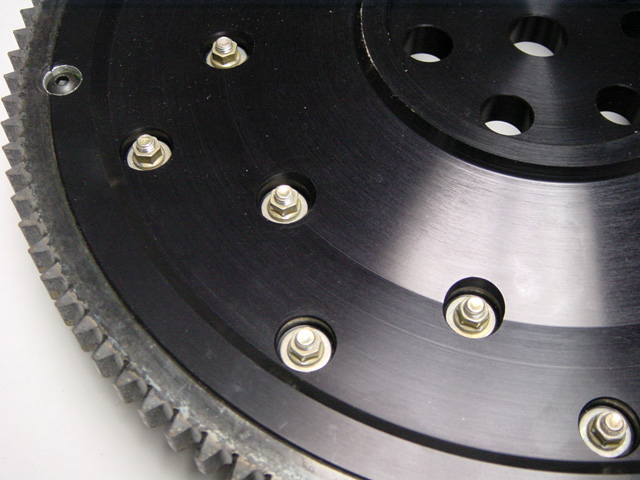
FWD flywheels with their larger diameters have less material on the back side. You can see the step down on the outer diameter. Less material is removed from the back side of a FWD flywheel. |
 |
With the back side cut, just the casting cleaned off in the center, then cut down to .500" thick behind the friction surface. |
 |
On the FWD wheels we are able to take some material off the outer diameter of the face. We leave enough material to keep the ring gear happy. |
 |
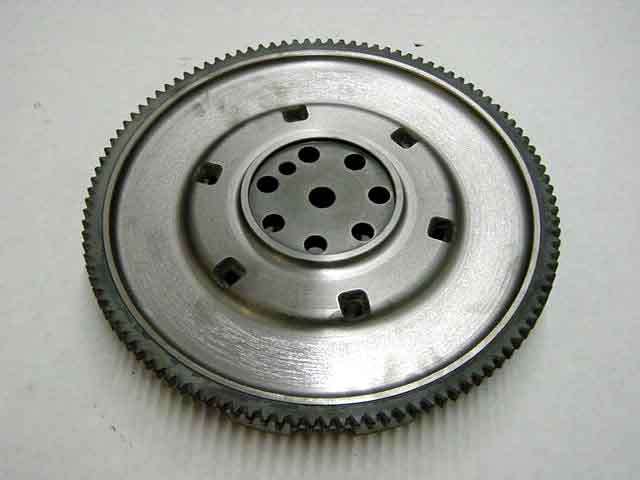
This is a flywheel from a 2.4 Spyder. It is already fairly light from the factory. Some people will always be worried about taking off too much material. Knowing that the factory considers this thickness to be safe reinforces our belief that we are not removing too much material. |
 |
You can see that on this already light flywheel from a 2.4 NT motor), to get the same depth and weight, we don't have to take off much. We are only making the flywheels as thin as Mitsubishi has already decided they would make them. |
| If you are running a puck style disc and or plan on running on a slipping clutch for too long, a lightened flywheel isn't for you. But then I don't know of any flywheel that will like that either. The same heat that cracks a stock flywheel will warp a Jun flywheel because they are so thin. The friction surface of an aluminum flywheel will warp and twist up with the same abuse. | |
Bad CoresYour core return will be rejected if:: |
|
 |
Too shallow on the friction surface. There should be at least some lip at the edge of the friction surface to the rough casting. The worse your friction surface is, the thicker this needs to be so that we can resurface it down to the good area. |
 |
Missing dowel pins, broken studs, stripped or damaged threads. |
 |
Cracks. Slight light surface checking will be fine. As long as they can be machined out, the core is still good. The deeper the cracks are, the more we need to take off. If there are minor cracks and there is a lot of meat there to work with, we can deal with it. If it looks close when we get the flywheel back, we will tag it with your name and send it out to get resurfaced. If it works out, you will get the core refund. |
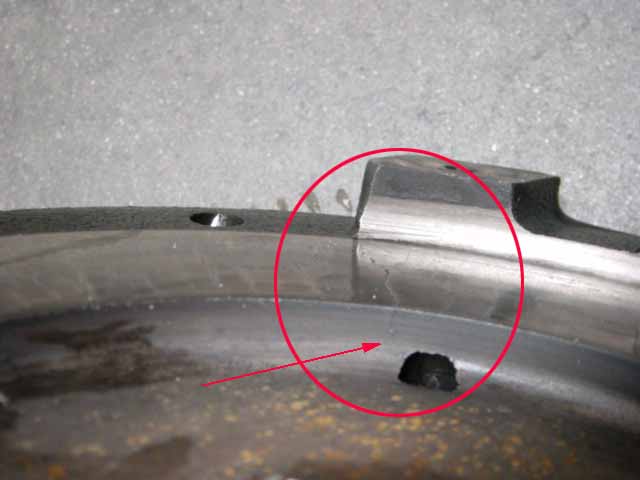 |
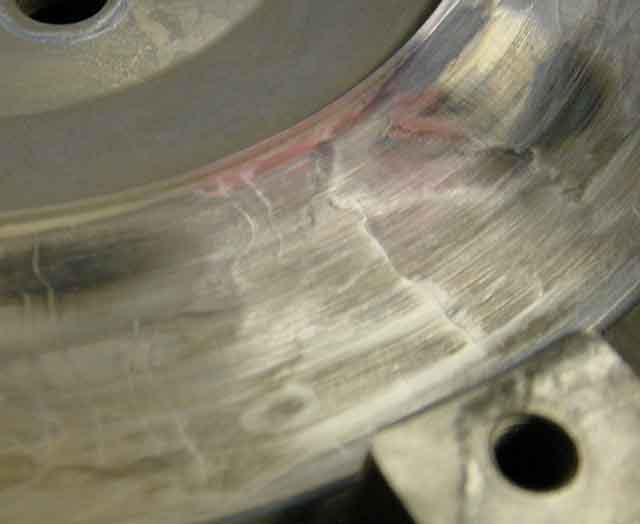
This pic shows a dangerous deep crack. One miss shift over rev and this flywheel will come apart, lightened or not. |
 |
This flywheel has a bad crack. If it was full thickness on the friction surface side, there is a 50/50 chance this crack would clean up. But you can see that the friction surface is already down below the cast surface. It is junk. |
 |
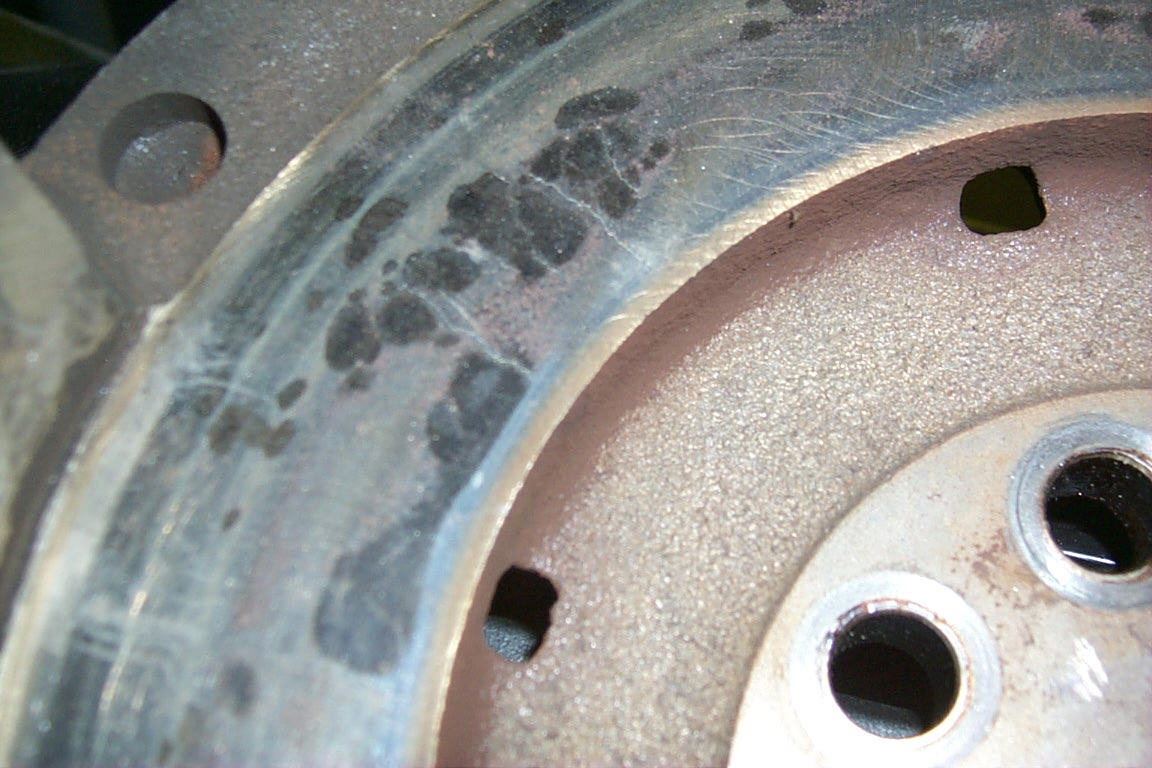
This flywheel only has heat marks on it. This is normal for anyone having fun with their car. This is no problem. |
 |
Another deep crack. Not a good core. |
 |
This flywheel looked like it could resurface clean. It did not, goes into the reject pile. You can still see the slight cracking |
Aluminum Flywheels |
|
|
Aluminum flywheels, while made out of high strength
aluminum, have a steel friction surface that can be replaced when
you do your next clutch job. Typically they do not get resurfaced.
A stock flywheel weighs in at about 19 lbs. Our lightened stock ones are 14 to 14.5 lbs. That 5 lbs alone is enough to feel a difference. Aluminum flywheels weigh 9 lbs for DSMs. Now you are talking. You are using less power to spin the flywheel and now have more power available to move your car down the road. Lots of people freak out about any "theoretical" negative drivability issues with lightened flywheels. They are wrong, it's all good. They are not too light for street use, they won't break apart, they are stepped correctly for ACT and CFDF clutches, On a 80 hp honda you could go too light, but not on anything with enough power to pull the skin off pudding. You will have to compensate a little in your launching technique, a little higher launch rpm will be necessary. Your shifts will be better with the engine rpm now better matching the next gear. These are SFI certified. |
Other Flywheels |
|
Jun Chromoly Flywheel |
|
 |
OOooohh, A Jun Chromoly flywheel, so very jaydeem. I gots to get me one of
them :-)
If you drive with a slipping clutch you will kill any flywheel. If you slip your clutch enough and make enough heat you will kill any flywheel. |
 |
This $500 Jun flywheel had about 4,000 hard miles on it. Nothing too crazy, just a lot of launches on a 16G'd AWD. Since they are so thin, the heat goes nowhere. You can see the heat marks right through to the back side. |
 |
The surface has deep cracks, the flywheel is too thin to
resurface them out. Jun said "So Sorry". $500 worth of junk
now.
They might be fine for a road racing car that does not launch. |
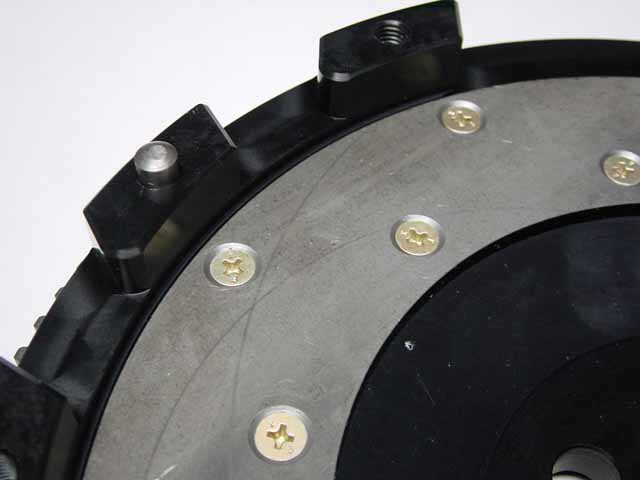
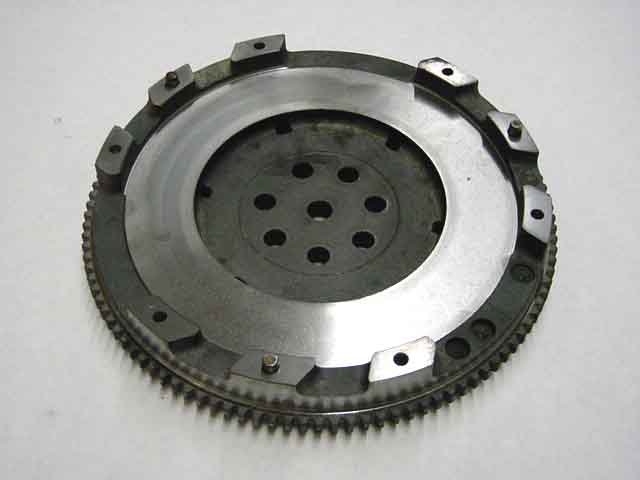
Early JDM Flywheels |
|
 |
They are actually quite thin behind the friction surface. They still have the full weight ring cast into them. |
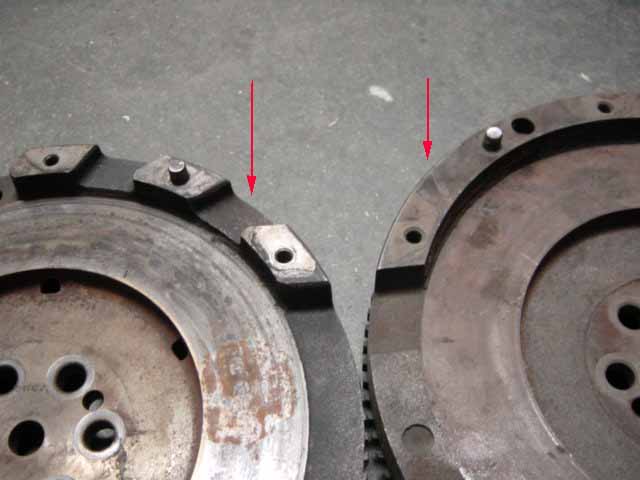
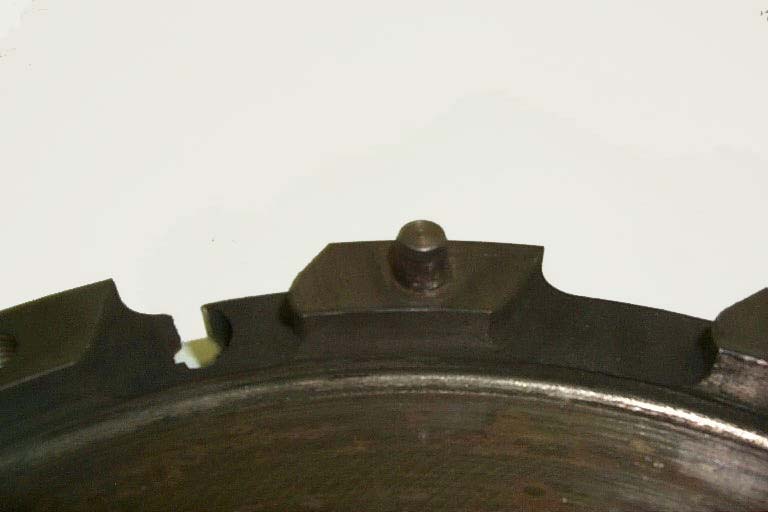
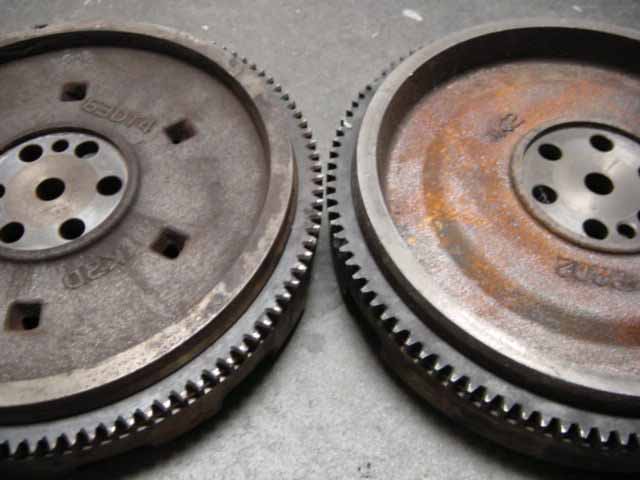
US Left Early JDM Right |
The problem is with the face. The step design is very different. The JDM flywheel has 3 full pieces where the pressure plate bolts on. The US flywheels have individual pads. The US style allows for better ventilation. But the big problem is that the later US clutches need that space between the pads for clearance. The JDM flywheel pictured does not accept the clutches that are readily available here. They are not suitable for core returns. |
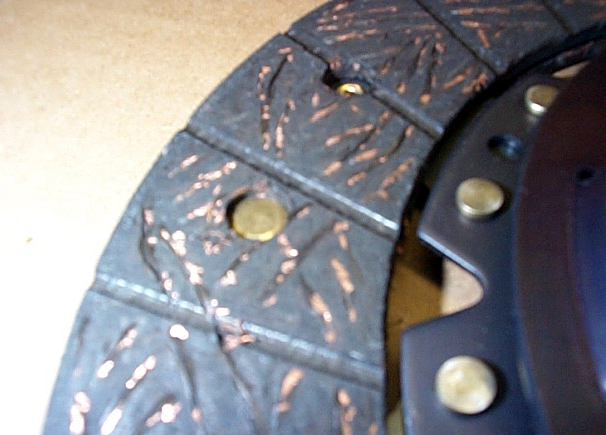
Metallic Puck Style Clutch Discs |
|
| They wont die. They can take a ton of abuse and wont turn into kitty hair. Even when they get so hot that the pressure plate warps and the diaphragm looses it's spring pressure, they wont fully die. Cool, right? The down side of that "never dying" is that it allows them to keep slipping, then heat up and grab. The slipping with out dying makes the surface cracks in the flywheel and pressure plate that will eventually cause the flywheel to come apart. Whether it is a stock flywheel, lightened stock flywheel or a Chromoly flywheel, puck clutches make cracks that kill flywheels, that kill bell housings and more. They have their place but I don't think in a street car. In a race car that gets regular inspections they can be fine. Also most puck clutches have a solid hub center that will contribute to horrible coast down gear noise (worse in an AWD). | |
|
Street style disc |
Puck style disc |
| Puck style discs can put up
with a lot of heat. You also need to slip them more
to keep from breaking things. More heat made. When a street disc is
slipped too much and gets hot, it disintegrates and turns
into kitty hair. You wont keep driving on an
overheated street disc. If you get a puck disc to
the same temp, nothing happens. That's nice because you can keep racing.
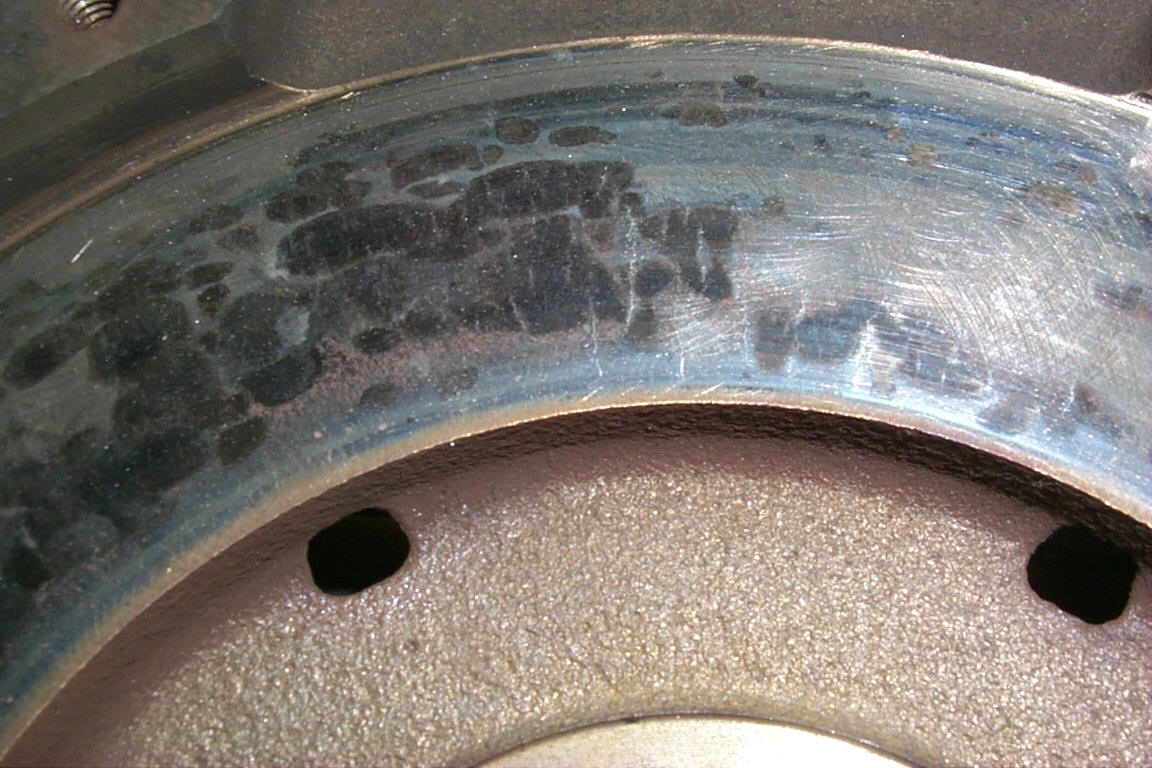
But that heat is hell on the flywheel. Just like brake
rotors crack when over heated, so do flywheels.
If you keep racing on a cracked flywheel, you will eventually saw your tranny in half. It does not matter if it is a lightened or stock flywheel. We get flywheels sent in to us regularly that are too cracked to use. Those guys cry like babies when they have to pay a core charge. From the cores we get, I would guess one out of ten racers are driving around with some cracking. |
|
Replacing Clutch Discs Only |
|
 |
ACT will sell you just a disc if that is what you want. Be careful when trying this. Almost any clutch that you have any fun with will have a warped friction surface with in as little as 5,000 miles. |
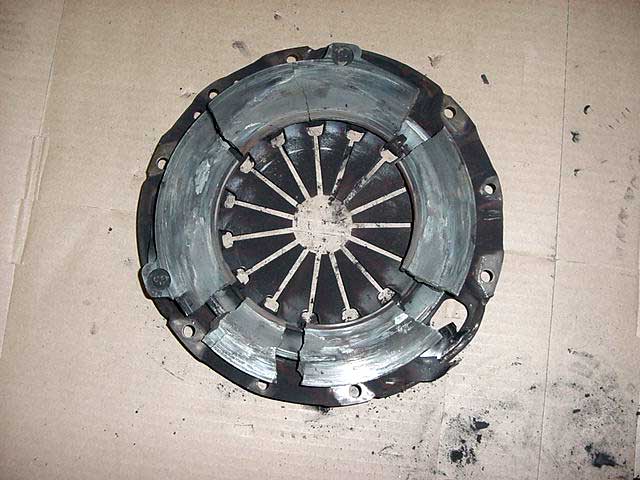 |
In very extreme case, even clutch friction surfaces can
crack and fail if driven slipping long enough. This busted stock clutch
cut apart the bell housing, starter and radiator.
When replacing just a disc, carefully inspect the friction surface for warpage and cracking. Some heat marks will be normal and expected. |
Clutch AdjustmentEvery time the clutch or flywheel gets replaced the clutch needs to be adjusted. Many people assume incorrectly that since it is a hydraulic system that it does not need adjustment or that it does not need adjustment. Wrong. You want a little free play off the floor before the clutch begins to grab. You also will need a little free play at the top of the pedal travel. |
|
 |
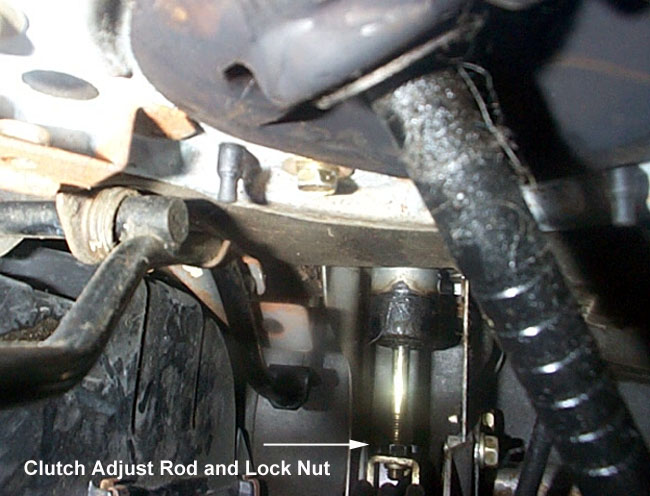
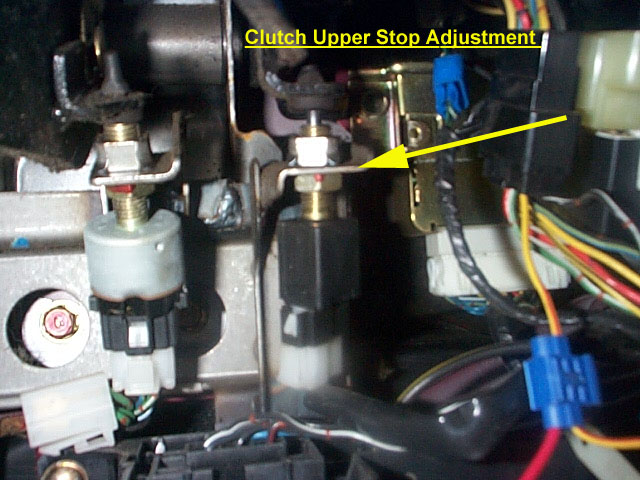
2GLoosen the lock nut on the adjuster rod and you'll be able to rotate the rod by hand. If getting the right free play off the floor makes it so that you loose the free play at the top of the pedal travel, you will need to adjust the upper travel stop. The upper travel stop is the cruise control switch. |
 |
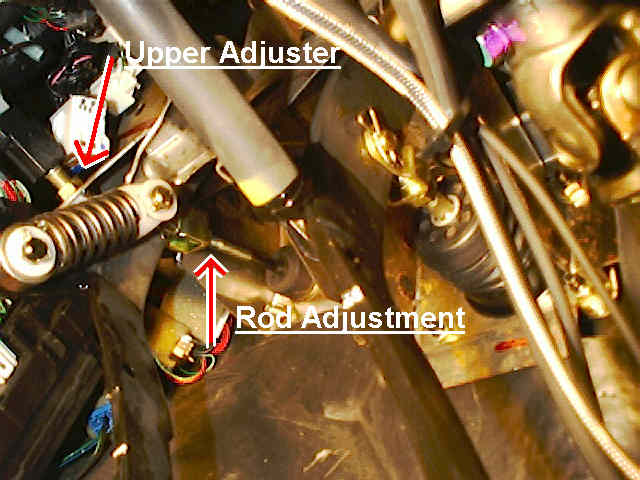
1G1G clutch pedal linkage is a little more complex. The upper stop adjuster is directly above the clutch pedal. The adjuster rod is over to the right above the gas pedal. 1G cars with the typical higher mileage of the average 1G Eclipse and the more complex linkage, 1G cars will often suffer from loose or worn linkage. |
 |
If you can wiggle the pedal with one hand, and you don't feel the clutch master cylinder rod moving with the other hand, you are suffering from this problem. The solution is to replace the pedal assembly, or possibly weld the linkage where it is loose. Either one requires more work to remove and reinstall the pedal assembly, you don't even want to know how much hassle it is. |
2G Pedal "Pump Up"If you are fighting an inconsistent pedal adjustment in a 2G, adjust the upper pedal stop adjuster so that you gain additional free play at the top of the pedal travel. Loosen the lock nut and turn the whole switch to get the necessary freeplay (see above pic). You'll probably end up with the clutch pedal sitting a bit higher than the brake pedal. If this is your problem, you will notice that the pedal suddenly gets very tight and the release point will suddenly move up a lot, this is the cause. 2Gs need free play at the top of the pedal travel. If it is close to no travel and right on the edge, then it pumps up. Only 2Gs have a relief valve in the master cylinder that needs to be uncovered so fluid can go back into the reservoir on the clutch release. If not, it gets tighter and tighter and tighter. Then it may slowly relieve the pressure and it is back to normal. Just a 2G thing. You need more free play at the top of the pedal travel. Left unchecked, the pedal will pump up more and more. The clutch will begin to slip since it is as if you are driving around with your foot on the clutch pedal. Also it plays hell on the crankshaft thrust bearings. The constant pressure pushes the clutch release bearing onto the clutch and flywheel. When centrifugal force throws the clutch release fingers outwards, they make additional pressure on the thrust bearings of the crank. This is an additional factor in short lived crankshaft release bearings and an additional potential cause for crankwalk.
|
|
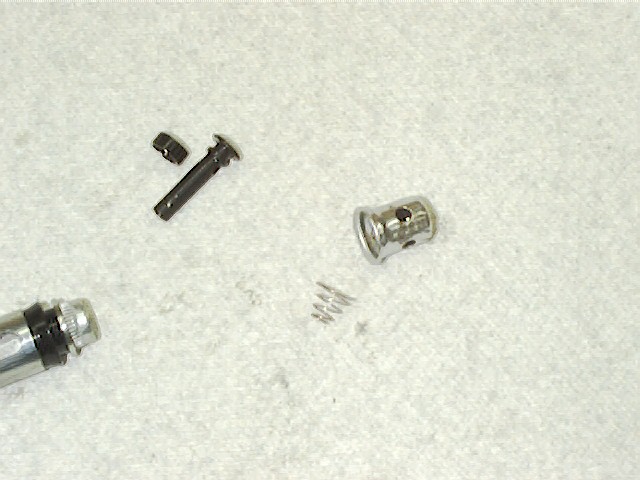
2G "Ghost Pedal"On very light foot pressure on a 2Gthe pedal drops to the floor all by it's self. ?? Yes. The little rubber seal in the pic above gets a little nick in it or a piece of dirt under it. On a regular pedal push, the seal seals fine and the clutch works normally. On a very light push, the seal does not seal well and fluid will bypass it. Since the 2Gs have a heavy assist spring, the additional assist is enough pressure to keep the pedal going towards the floor all alone. Quite disturbing to watch. Replacing or rebuilding the master cylinder will fix this. A close up pic of the troublesome valve inside the master cylinder:
|
|
Pedal To The Floor After A Left TurnYou are screwed ;-) The thrust bearings on the crankshaft are so worn, that the crankshaft flops so far to the right on a left turn that most of the pedal travel in the clutch system is used just to put the crankshaft back to the left. You have "Crankwalk". Go here to see how bad off you are. |
|
More Other Stuff |
|
 |
Hydraulics. The pressure in the hydraulic system causes
wear every time you press on the clutch pedal. The worn off pieces of
rubber show up as black junk in the hydraulic fluid. If you are
having difficulty with your clutch adjustment, check it out.
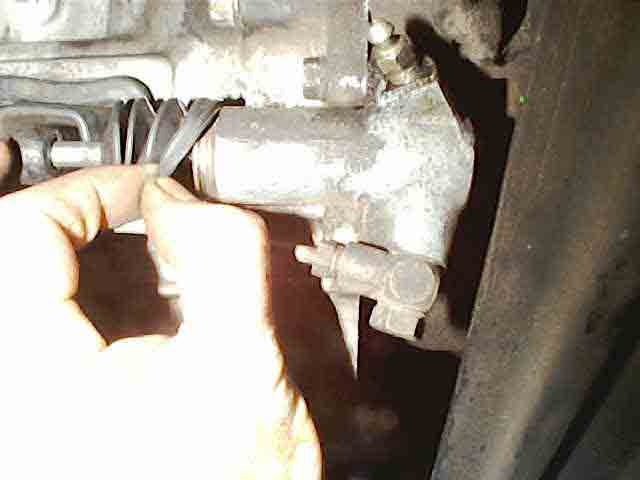
If you pull the slave cylinder boot back and fluid comes out, the slave cylinder is dead. If your slave cylinder is dead, the master cylinder has also taken the same amount of abuse. You really should replace them both at the same time. |
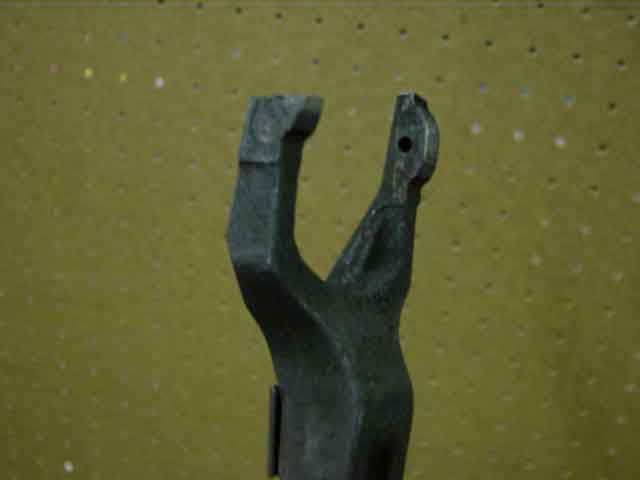 |
Throw out bearing release forks can break. It is not
common but always a possibility. If you are a paranoid person, if having
to deal with a possible broken fork (tranny needs to come back out to
change it) will be the end of the world for you, then consider spending
the extra $65 in parts to replace the release fork and pivot ball.
Breakage can happen on a stock clutch but a flawed fork, or it can happen on a big clutch with a good fork but with a lot of time on it. |
| The release bearing arm and the pivot ball
will wear over time. Replacing both is one way to deal with the problem.
Adding a washer or two under the arm is another way.
DO NOT ADD A SHIM TO A NEW FORK AND BALL. When the transmission is first installed in the car and just bolted down to the motor, this is the time to check the wear on the arm and ball. Checking it right that moment will save hours of hassle later! Look at where the arm protrudes out through the square boot on the front lower bell housing. With the arm pushed over towards the passenger side so that the release bearing is just touching the clutch, the arm should be either in the center of the square hole or towards the driver's side of center line.
If you are having problems with a clutch adjustment, don't be tempted to try to lengthen the clutch slave cylinder rod. It may work for a few symptoms (worn pedal assembly mostly) but it is not the right way to fix things. In order to take up additional free play, it puts constant pressure on the release bearing. |
|