
| Koni sells an insert intended for the front of the 90-94 Mitsubishi Eclipse. The strut tube inner dimensions and upper threaded rod of the 1G Eclipse is exactly the same as the 2000-2002 Eclipse. This means that the Koni insert is a direct swap into the 3G front strut housing. This swap on a 1G Eclipse or a 3G Eclipse requires a fair amount of mechanical ability. You need to be able to cut open the stock strut tube and drill large holes in addition to being able to remove and install the springs with out hurting your self. This page is intended to show you what is involved so that you can make an informed decision when it comes to purchasing and installing these inserts. We have pricing information on both the parts involved and our shop labor at the bottom of the page. |
| There are two was to install the Koni inserts.
The first way is as they are intended to be installed by Koni. |
|
|
Koni's Instructions |
|
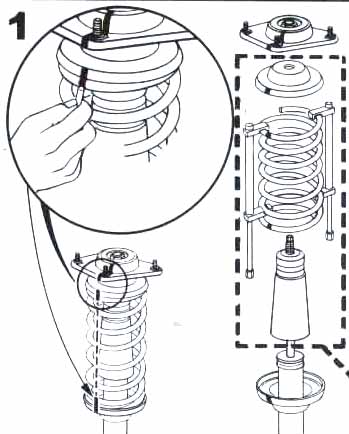 |
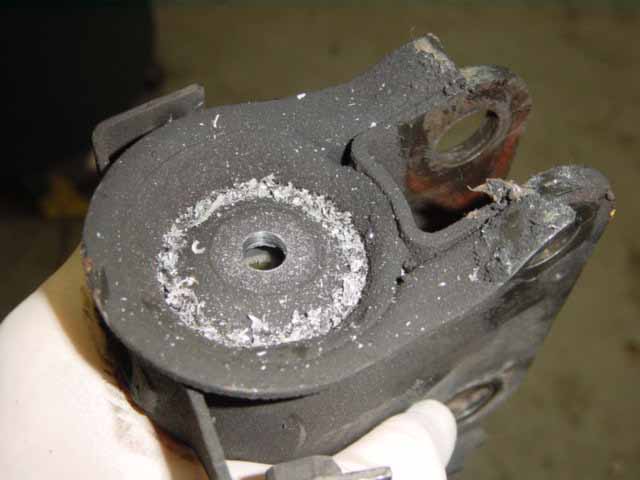
Here, Koni is asking you to make alignment marks on the bearing plate,
the upper spring perch and the lower spring perch. The spring perches
are offset to clear the strut tower. If not aligned properly, the spring
and perches will contact the body when you turn the steering wheel.
The standard spring removal and install steps and precautions apply here. Many big chains will loan you a spring compressor for free or they can be purchased for $25-$50. Air tools are a HUGE help here but not necessary. |
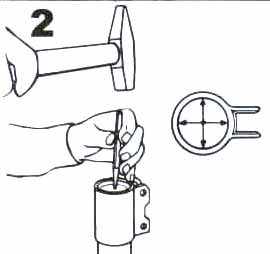 |
Center punching the center of the bottom of the strut housing. |
 |
Drill a starter hole in the bottom of the strut housing. 1/8"
hole is fine. This will bleed off any residual pressure from the strut.
Here Koni is having you put a piece of tape over the hole to not make a big mess with oil everywhere. |
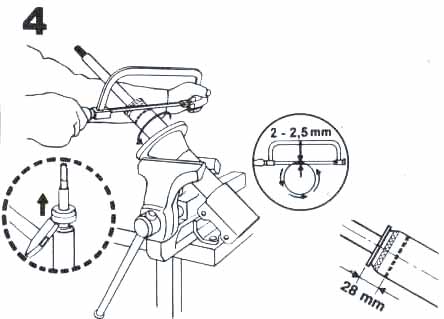 |
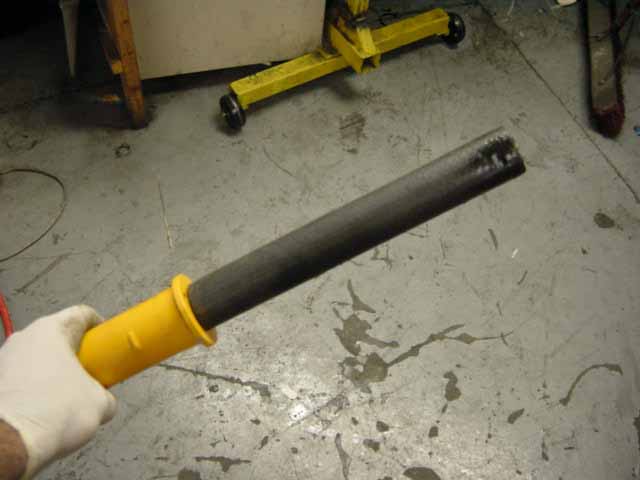
About 1 3/4" below the top of the strut, use a hack saw to cut through the tube. Keep going around in a circle until the tube is cut through. You dont need to cut all the way through the strut rod, just the outer tube. About 1/16" deep, or a little more. Knock the upper part out of the strut tube. |
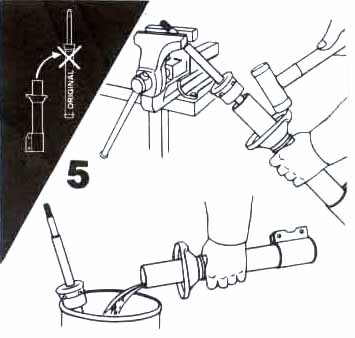 |
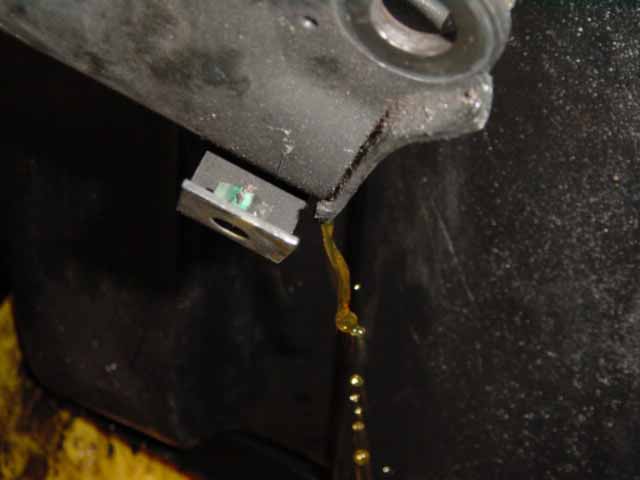
With the strut rod in a vise, tap down on the strut body. The stock insert will come out. It will be an oily mess. Have a drain pan ready. Dump what ever oil remains in the housing into the drain pan. Dispose of the oil like you would motor oil. |
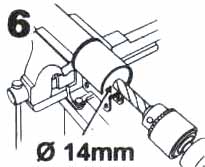 |
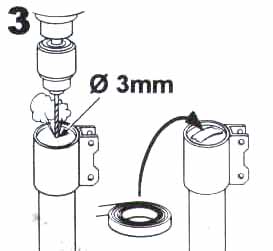
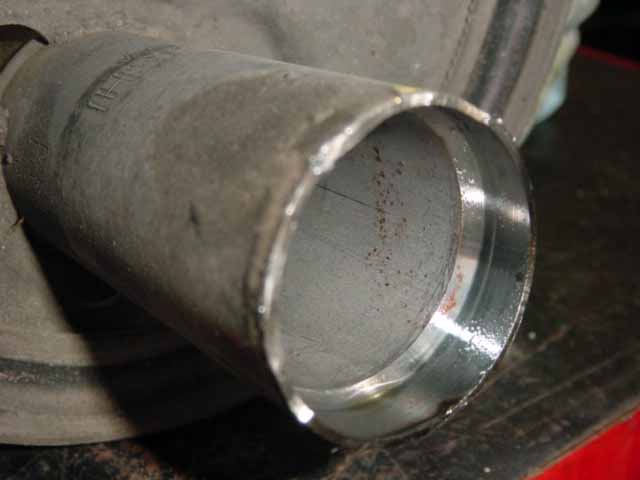
Now, using the starter hole you made earlier, drill a larger 9/16" hole in the bottom of the tube. If you cant come up with a drill that big, use a 1/2" drill and file it 1/16" bigger. |
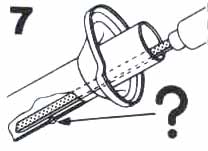 |
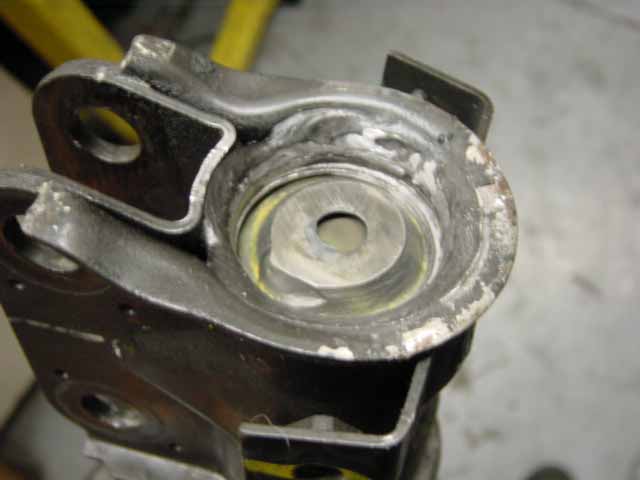
Check the inside of the strut tube for any burrs or protrusions. Remove them if necessary. |
 |
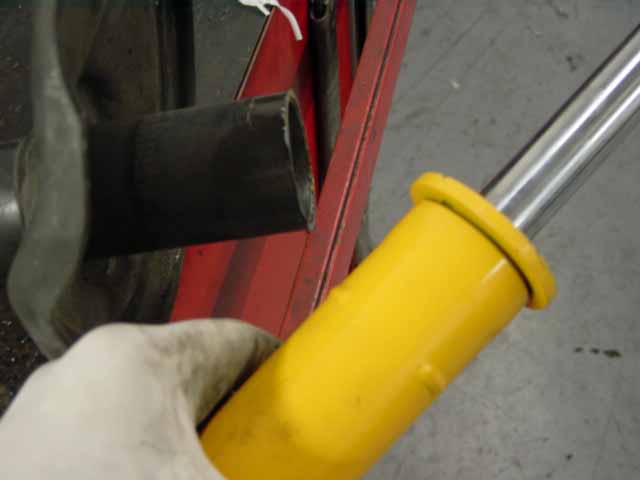
Place the rubber sleeve over the end of the strut tube. Slide the Koni insert into the strut tube. |
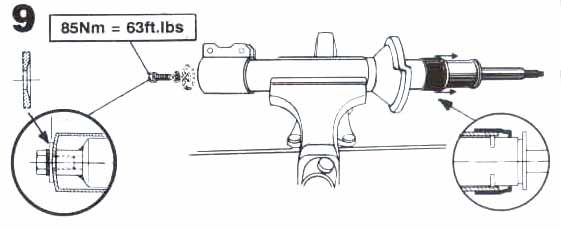 |
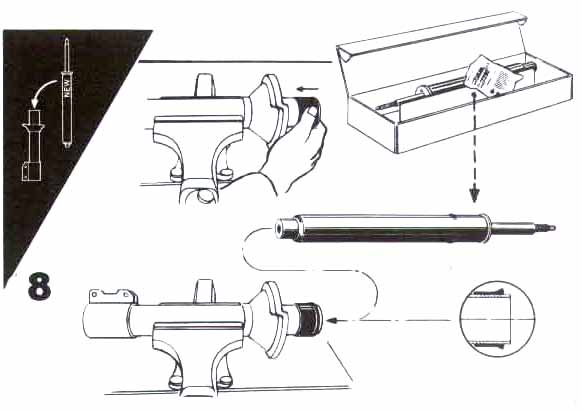
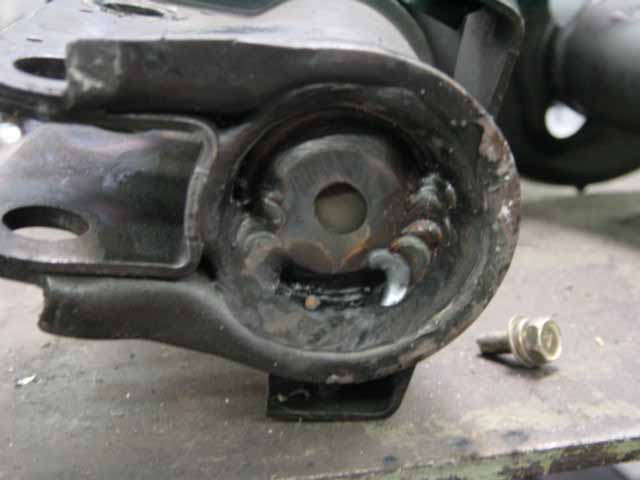
Use the supplied bolt, concave washer and lock washer to draw the Koni
insert down into the strut tube. Torque the bolt to 60-65 foot pounds.
It is a good idea to check the torque on this bolt one month later and
also one year later.
Roll the rubber sleeve up to cover the joint where the insert meets the strut body. |
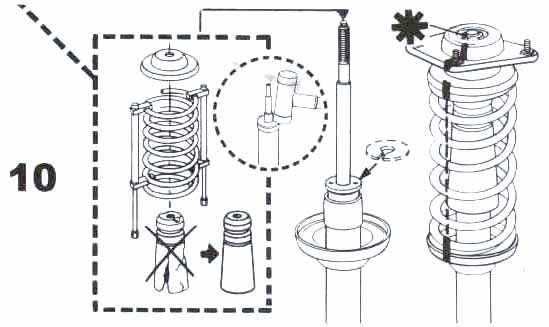 |
Place the white flat plastic washer on top of the strut insert over
the rod. Reinstall the spring assembly. Take note of your alignment
marks.
Dont forget to install the bump stops and accordion dust boots. |
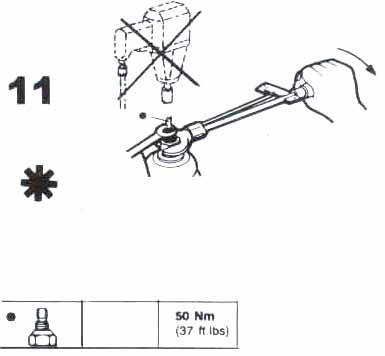 |
Torque the top nut to 37 foot pounds. Do not use an impact wrench. With an impact wrench, you risk breaking off the upper tip of the rod (it is hollow) and you risk damaging the adjuster tab. |
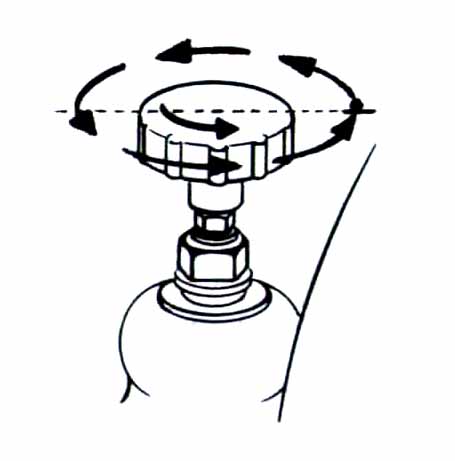 |
Adjustment knob placed onto the adjuster tab. |
Additional pics |
|
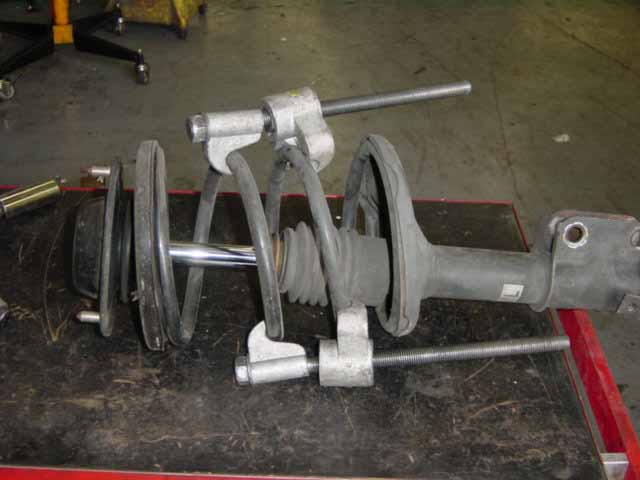 |
Spring compressor clamping down on the spring. |
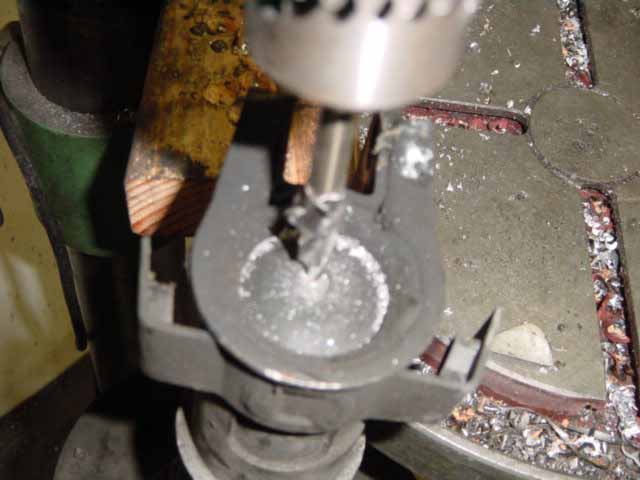 |
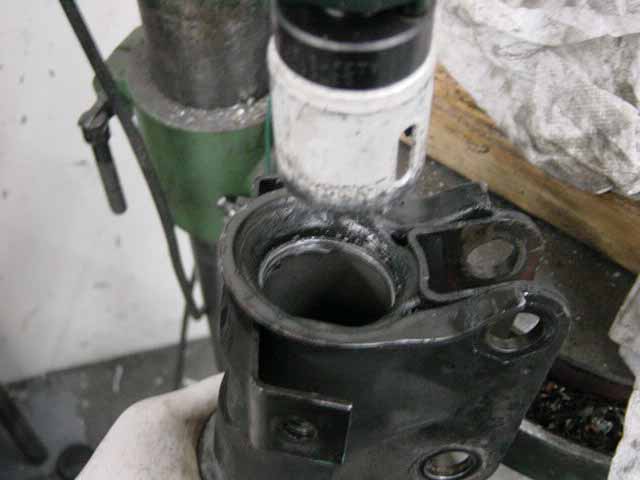
Using a Big Ol' drill press to drill the bottom hole. A hand drill works fine too. |
 |
Starter hole drilled. We blow a bigger 1/4" hole in the bottom. |
 |
Lets us drain all the oil out. You need to pump it some to get all the oil out of the valving. |
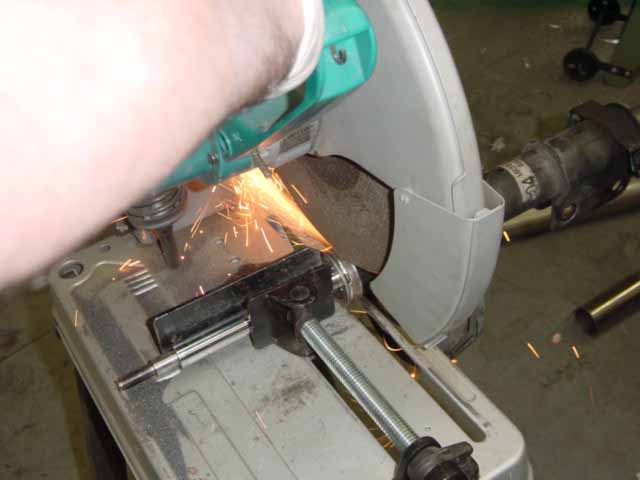 |
We cheat when it comes to cutting the top of the tube off. |
 |
We use a chop saw and make a big smokey mess. |
 |
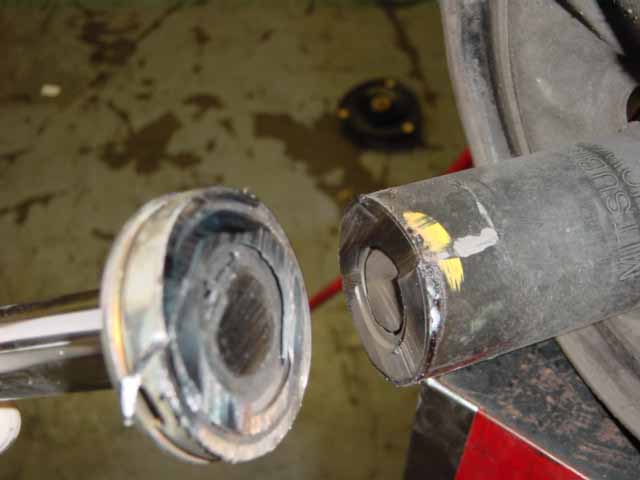
Here it is with the inner strut guts just poking out. |
 |
All the guts out. |
 |
Empty tube. |
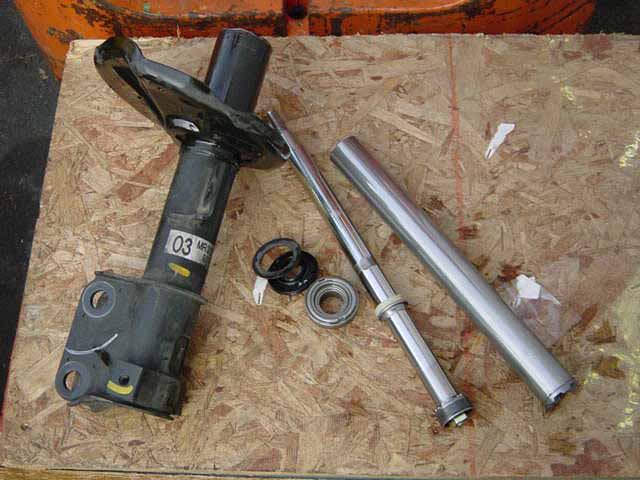
Short Struts |
|
| The Koni Inserts can be modified to allow an additional 3/4" of suspension travel. This additional travel can be a godsend if your car is lowered. This means an additional 3/4" before you slam into the bump stops. It is a lot more involved to install them this way. Also, installing the springs is a total pain. The springs need to be compressed an additional inch to get them back on. This does not change the ride height (lower the car) at all. You are only gaining additional suspension travel. Now, you ask for additional travel, you'll get it, right? If you have big tires, wide rims, a low car and rough roads, expect the tires to touch the fender liner at times. All of the ones we have installed locally and 90% of the shortened Konis we ship have no problems with this. | |
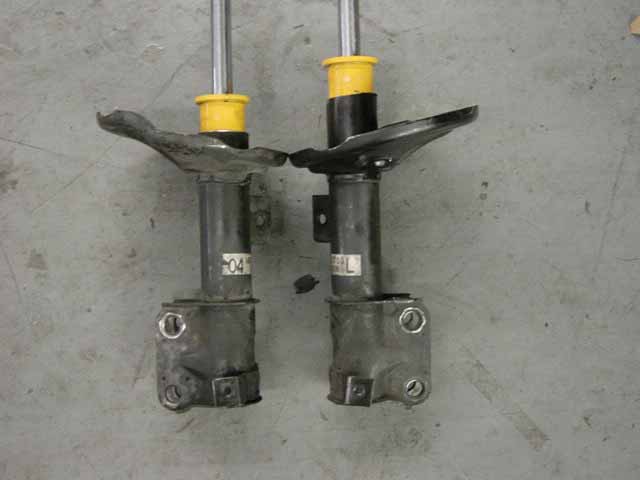 |
Here you can see the difference between the
Koni inserts installed short (left) and the standard way that Koni
recommends (right).
By installing them short, you will void the lifetime warranty from Koni. Technically, by installing them on a 3G you are voiding the warranty. But only if you tell them you had them on a 3G.. :-) Right? (They would have no way of knowing they were not installed on a 1G Eclipse otherwise.) |
 |
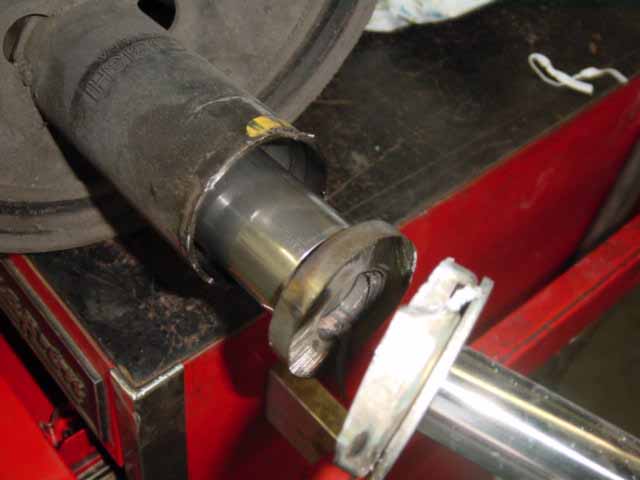
We cut a big hole in the bottom of the strut tube with a hole saw. |
 |
The threaded lug is cut off. |
 |
Cleaning the thick yellow paint off the insert where we will be welding. |
 |
When playing with the inserts, we slide a piece of rubber hose over the rod. If you in any way scratch or nick the rod, the insert is junk. You can also use several layers of duct tape (some cheap tapes can leave a nasty residue). |
 |
The lip at the top of the Koni Insert will
not allow a coil over sleeve to be slid over it. Either it needs to be
ground down, or you need to be sure the threaded sleeve is already
installed onto the strut body before inserting the Koni insert into the
tube.
In this pic, you can see the little nubs on the side of the insert. These nubs grip the inner wall of the housing for a snug fit. |
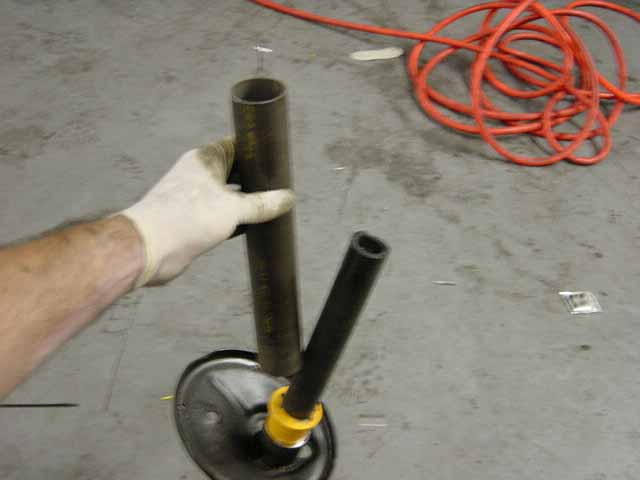 |
Since we are not able to use the bolt that Koni provides to draw the insert down into the housing, we have to beat it down in. |
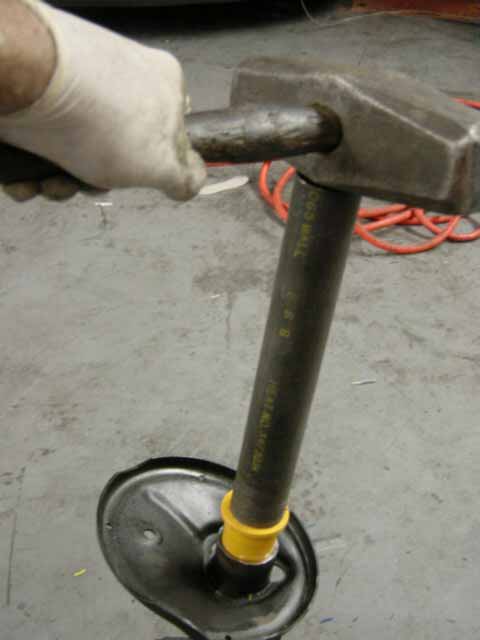 |
We use a pipe that slides over the strut rod and contacts the top of the insert body. We then beat on the pipe to drive the insert into the housing and flush with the hole we made in the bottom of the housing. |
 |
The bottom of the insert now is flush with the hole in the bottom of the housing. |
 |
We then SLOWLY and CAREFULLY weld the insert into the housing. With the lug at the bottom cut off, this is the only way to hold the insert into the housing. We are welding on the thicker double layer part of the insert. Also, we are welding a little at a time. Just about 1/4" at a time. We allow the strut to cool so that it can be touched before welding further. This slow careful welding does not damage the insert or the valving. |
 |
By welding slowly and on the double layer of steel, there is no explosion risk. If you dont know what you are doing, dont try this at home kiddies. |
We currently have the Koni Sport front inserts in stock. They are $145 each. |
||||||||||||||||||||||||||||||||||||||||||||||||||||||||||||||||||||||||||||||||||||||||||||||||||||||||||||||||
If you are local, us installing everything: |
||||||||||||||||||||||||||||||||||||||||||||||||||||||||||||||||||||||||||||||||||||||||||||||||||||||||||||||||
| You need to make an appointment to bring the car in. We
are usually able to get the car in with in a week. You will need to drop
the car off for an entire day. We are not able to do it "while you
wait".
The cost to remove and install the pair of front strut assemblies from the car is $40. The cost to remove and reinstall the springs is $20 for the pair. Once the springs are removed, the cost is $50 to cut the pair open, take out the stock inserts, clean the housings and install the Koni inserts into the strut housings the way that Koni recommends. This gives you the same amount of suspension travel as stock. If you want the strut inserts shortened for 3/4" additional suspension travel, it is $40 additional. By installing them shortened, you will void the lifetime warranty from Koni. The car will ride and handle much better however. It is your choice. Add $40 to install rear shocks and or lowering springs on the rear at the same time as installing the fronts. E-mail Tony to set up an appointment for the install.
|
||||||||||||||||||||||||||||||||||||||||||||||||||||||||||||||||||||||||||||||||||||||||||||||||||||||||||||||||
Local, but us modding the struts only: |
||||||||||||||||||||||||||||||||||||||||||||||||||||||||||||||||||||||||||||||||||||||||||||||||||||||||||||||||
| If you are local, you remove the strut assemblies your
self but are unable to deal with removing and reinstalling the springs.
You bring in just a complete spring/strut assembly:
The cost to remove and reinstall the springs from the struts is $20 for the pair if you bring them in with the springs still installed.. Once the springs are removed, the cost is $50 to cut the pair open, take out the stock inserts, clean the housings and install the Koni inserts into the strut housings the way that Koni recommends. This gives you the same amount of suspension travel as stock. If you want the strut inserts shortened for 3/4" additional suspension travel, it is $40 additional. By installing them shortened, you will void the lifetime warranty from Koni. The car will ride and handle much better however. It is your choice. An appointment is not necessary, we will need the struts left here for an entire day.
|
||||||||||||||||||||||||||||||||||||||||||||||||||||||||||||||||||||||||||||||||||||||||||||||||||||||||||||||||
You are far away and we will be shipping you installed inserts for exchange: |
||||||||||||||||||||||||||||||||||||||||||||||||||||||||||||||||||||||||||||||||||||||||||||||||||||||||||||||||
| If you are far away and we are going to
ship you struts already made up for you to install. You send us your old
dead struts back with in 2 weeks:
If you are a frequent repeat customer, you pay $40 additional for the core/exchange deal. If you are a new customer, we will charge you a $170 core charge. When we get your old front struts back (valving can be dead, strut bodies must be straight) we will refund you $130. We are keeping $40 of the core money to go towards buying core exchange parts. If you wish to keep your old struts, you just pay the full $170, let us know your plans at the time you place your order. The cost is $50 to cut the pair open, take out the stock inserts, clean the housings and install the Koni inserts into the strut housings the way that Koni recommends. This gives you the same amount of suspension travel as stock. If you want the strut inserts shortened for 3/4" additional suspension travel, it is $30 additional. By installing them shortened, you will void the lifetime warranty from Koni. The car will ride and handle much better however. It is more difficult to install the springs onto a shortened strut housing.. You or your mechanic will need two pairs of spring compressors to get the springs clamped down far enough. It takes at least an extra 20 minutes of wrestling with them to get the springs back on. It is your choice. Modifying the strut bodies for additional travel doe not affect the ride height. It will not raise or lower the car. You just get more suspension travel. To sum it up:
|
||||||||||||||||||||||||||||||||||||||||||||||||||||||||||||||||||||||||||||||||||||||||||||||||||||||||||||||||
What Rear Shocks to get? |
| We recommend as a first choice, the Tokico Illumina 5 way
adjustable shocks. Cost is $170 per pair (through about 2/02) . We think
these best match the characteristics of the Koni valving and adjustment.
As a second choice, the KYB AGX adjustable shocks. Cost is $170 per pair. These are fine, adjustment range ends up stiffer than the Tokicos. Some guys cry about them being too stiff. Last choice for us is the Koni Sport adjustable shocks. At $135 each they are the most expensive and the least impressive. We have no problems or issues with mixing and matching brands. |
Who and WhenI'll try to keep this list current to with in a day or two just to help everyone know where they stand. Please install them and get your cores back to us ASAP, there are others waiting. Guys that are buying the struts outright and not doing the exchange will sometimes get done sooner since we dont have to wait for a pair to be returned. Your credit card is not charged until the struts actually ship out to you. We are currently running 4 pairs in circulation for the exchange program (4/02) |
||||||
| Who | What | Order received | Parts in/ Cores Avail |
Building Parts | Shipped | Cores Returned |
| Joe Fiddelman | Short | 2/5 | Yes | 3/15 | 3/18 | |
| David Nolan | Short | 2/6 | Yes | 3/19 | 3/22 | |
| Travis Howard | Short | 2/6 | Yes | 3/22 | 3/26 | Received |
| Rachel Bish | Std Length | 2/20 | Yes | 4/8 | 4/11 | |
| Shelby Thorton | Short | 2/25 | Yes | ~4/12 | 4/15 | |
| Michael Hilton | Short | 2/25 | Yes | 3/22 | 3/26 | No exchange |
| Ben Northrop | Short | 3/5 | Waiting for cores | |||
| Stephen Palmroth | Std Length | 3/11 | Waiting for Struts | 4/22 | 4/24 | No Exchange |
| Karl Harris | Short | 3/14 | Waiting for cores | |||
| John Matisa | Short | 3/18 | Waiting for cores | |||
| Ryan Saghir | Short | 3/19 | Waiting For Cores | |||
| Brian Sewell | Short | 3/20 | Waiting For Cores | |||
| Seneca Johns | Std Length | 4/9 | Waiting for cores | |||
| Alex Meredeth | Short | 4/9 | Waiting for struts | 4/19 | 4/24 | No Exchange |
| Chris Hurm | Short | 4/9 | Waiting for cores | |||
| John Tmmerman | Short | 4/11 | Waiting For Cores | |||
| Joe DeNave | Std Length | 4/15 | Waiting For Cores | |||
| Alex Rudinski | Short | 4/18 | Waiting For Cores | |||
Contact Road///Race
Engineering
13022 La Dana Ct. Santa Fe Springs, Ca 90670
Tel (562) 777-1522 Fax (562) 777-1562
This page created and maintained by ArtOfWeb.com
last updated 4/02mw